Showing posts with label rigging. Show all posts
Showing posts with label rigging. Show all posts
2025-03-02

2023-07-21
2019 - Scoob! rigging reel
(Update 2025-03: I deleted the original video, because of vimeo policy changes. But the same shots are at the start of this: https://vimeo.com/pazrot/2020. The timestamps mentioned here are off by a few seconds)
- Content from 2019, for the animated feature film "Scoob!". It was my first show after moving to Canada and starting as Senior Rigging Artist at Reel FX.
- Was done for my 2020-2021 demo reel that got me to Vancouver / VFX
- I used a blinn/highlight shader to be more honest and show the surface curvature. With lambert/flat shaders you can get away with a lot more. Even wireframe is pretty forgiving.
- Velma body rig (0:01 - 0:32):
- I could not actually find good body deformation shots in the movie, because she does not move much in general and wears a thick sweater.
- 0:08 Deformation issue when metacarpals are offset. This area was always a struggle, because of the topology. It was the standard hand topology at the time and not supposed to be changed. That's why I didn't show the hands in the breakdown.
- 0:11 clavicle up chest corrective blending issue. It stops suddenly, when it should fade out or extend instead.
- Cpt. Caveman face rig (0:32 - 0:59)
- His face has a high range of motion with close ups in the movie, so I was happy with the shots that I could select for this demo.
- 0:48 Eyelid, mouth corner topology distortions: I did major retopology, maybe full retopology for his face, but afterwards there was a design change, which created these topology distortions in this somewhat neutral pose (The design/model change was great though)
- 0:57 shape and blend issues between eyebrows.
2020-02-09
The One Tool Challenge
Because there are so few useful and production ready Maya tools online. I was thinking how nice it would be, if every technical Maya user in the world would share (+support) even just one such tool in their lifetime. Putting it that way, should make it sound trivial. And if it were the case we would all be better off.
For myself I would consider prSelectionUi (https://vimeo.com/pazrot/prselectionui) to be a success in that regard. It is mostly for animators and after publishing it on highend3d and making a Vimeo video in 2012 it self distributed and to this day I find it installed at every company I go to and a lot of animators are using it.
For myself I would consider prSelectionUi (https://vimeo.com/pazrot/prselectionui) to be a success in that regard. It is mostly for animators and after publishing it on highend3d and making a Vimeo video in 2012 it self distributed and to this day I find it installed at every company I go to and a lot of animators are using it.
In general I would recommend to consider:
If someone is looking for useful tool ideas. The most fundamental Maya UIs have a lot of room for improvement, so pretty much ever Maya user would benefit from those:
- Is the tool actually useful? (doing something difficult != doing something useful)
- Can it already be done in Maya? Or has someone else already made a publicly available version?
- Is it useful enough for other people to be worth the time and effort to learn it, install it and keep it updated?
- Test it a while in production with a small group of people before sharing it publicly.
- Are you willing to support it?
- Connection editor with name search/filter field to reduce the time and focus required to find the right attribute. Even with alphabetic ordering is it pretty tedious and that also does not work well together with child attributes, because it orders them together with the root attributes. In addition, it would also be nice to make it scalable, like the option to connect one output into multiple nodes input attributes at the same time.
- Add and Edit Attribute Editor for the 21st century. They have probably not been changed since 1999 and could benefit a lot from a major overhaul. I would also merge them into one.
- A non-destructive Node editor / Hypergraph: One that does not move the editor-view and nodes around on it's own when working with it. The node editor version would be a lot more work, so I would probably start with something closer to the Hypergraph.
- Attribute editor for multiple nodes at once (setting values applies to all nodes, not just one). I don't know how the aeTemplate reading works, so it might be really hard to do. In that case an improved Attribute Spread Sheet could be a better goal.
2019-12-31
prKeepOut.py making-of
A custom Maya node that can be found here:
https://github.com/parzival-roethlein/prmaya
A few months ago I started making improved array versions of Maya nodes for smaller, scalable, procedural graphs.
The prKeepOut node specifically had some relevance for production: I had an asset with around a hundred armor pieces and I thought about using keepOut nodes, but ended up deciding against them because it would have been overkill: Each armor piece would have required multiple keepOut nodes, which would have slowed down the rig a lot, take a long time to setup and probably never really work that well, because of multiple armor pieces overlapping in areas with multiple deformation axes. In the end I copied the skinCluster and blendShapes from the body and tweaked them to make the armor deform more rigid and add some offset controls for a few of the armor pieces.
It took me a few evenings after work to write prKeepOut, so in hindsight I wondered why I hadn't done it sooner. The "algorithm" is less than 100 lines and the rest is just the verbose Maya API way of creating/querying/setting attributes.
I thought about writing more about the making-of and reasoning. But it's open source and just basic Maya API, linear algebra usage. And I imagine the changes make sense to anyone who has used the 10 year old Maya keepOut node.
Initially I had shape inputs specific for each ray to support multi layer collision, but removed it again, because it would make the node usage too complex and risk evaluation cycles.
With the recent input matrix announcement for transforms in Maya 2020+ I'm thinking about switching to matrix outputs.
A few weeks later Autodesk announced bifrost graph, which looks amazing and will hopefully make these kind of custom nodes obsolete.

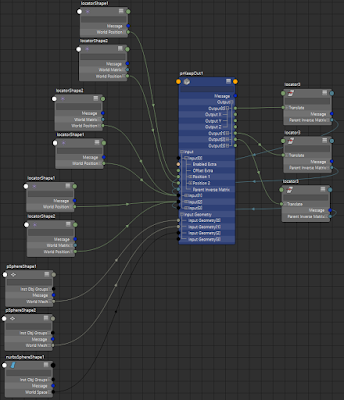
https://github.com/parzival-roethlein/prmaya
A few months ago I started making improved array versions of Maya nodes for smaller, scalable, procedural graphs.
The prKeepOut node specifically had some relevance for production: I had an asset with around a hundred armor pieces and I thought about using keepOut nodes, but ended up deciding against them because it would have been overkill: Each armor piece would have required multiple keepOut nodes, which would have slowed down the rig a lot, take a long time to setup and probably never really work that well, because of multiple armor pieces overlapping in areas with multiple deformation axes. In the end I copied the skinCluster and blendShapes from the body and tweaked them to make the armor deform more rigid and add some offset controls for a few of the armor pieces.
It took me a few evenings after work to write prKeepOut, so in hindsight I wondered why I hadn't done it sooner. The "algorithm" is less than 100 lines and the rest is just the verbose Maya API way of creating/querying/setting attributes.
I thought about writing more about the making-of and reasoning. But it's open source and just basic Maya API, linear algebra usage. And I imagine the changes make sense to anyone who has used the 10 year old Maya keepOut node.
Initially I had shape inputs specific for each ray to support multi layer collision, but removed it again, because it would make the node usage too complex and risk evaluation cycles.
With the recent input matrix announcement for transforms in Maya 2020+ I'm thinking about switching to matrix outputs.
A few weeks later Autodesk announced bifrost graph, which looks amazing and will hopefully make these kind of custom nodes obsolete.


2018-10-09
prClosestPoint.py making-of
A "new" Maya deformer that can be found here:
Origin
Initially I just wanted to update my old prAttractNode from 2011 to work in Maya 2016+, for which I only had to update the envelope, inputGeom, outputGeom attributes (MPxGeometryFilter instead of MPxDeformerNode). But then I also added new attributes and changed the existing ones to make it more user-friendly, scalable, functional:
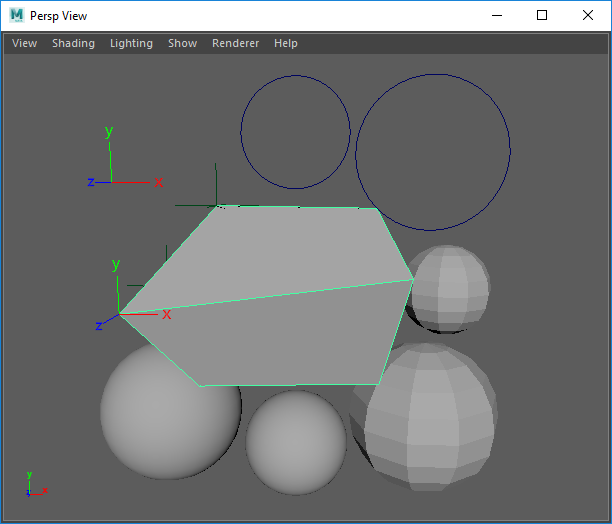
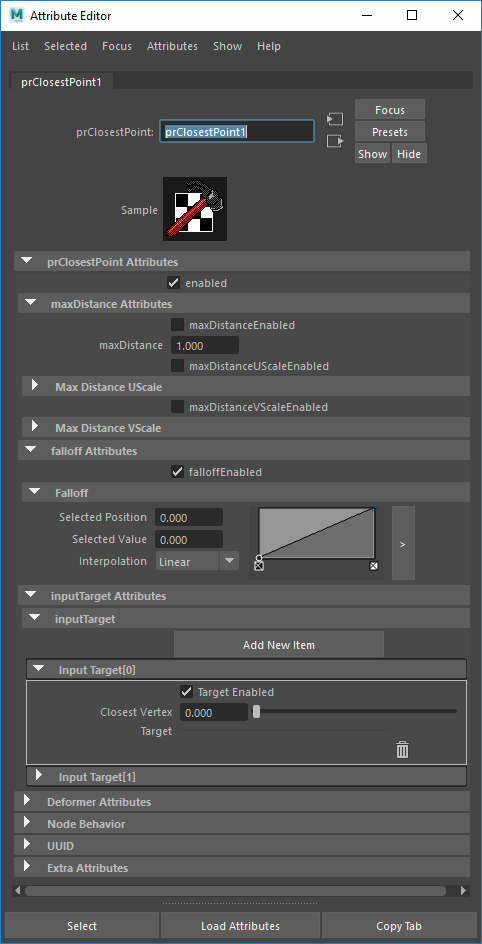
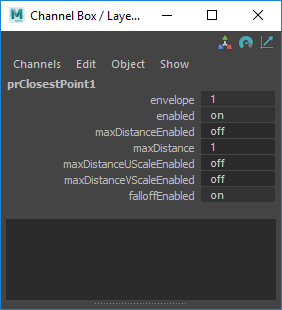
Direct file link:
Origin
Initially I just wanted to update my old prAttractNode from 2011 to work in Maya 2016+, for which I only had to update the envelope, inputGeom, outputGeom attributes (MPxGeometryFilter instead of MPxDeformerNode). But then I also added new attributes and changed the existing ones to make it more user-friendly, scalable, functional:
- Added positions as target option
- Set all target type attributes to arrays
- Made all targets work simultaneously
- Added on/off switch attributes
Usability
In production I mostly used prAttractNode when modeling. For sticky lips only once or twice. But that might be because of the kind of stylized projects I usually work on. It could be much more useful for visual programming, but many nodes are still missing for that in Maya. Python is also too slow for that, unless the affected vertex count is small enough.
Code
I would have liked to switch to the Python API 2.0, but the deformer proxy class has not been ported yet.
For the mesh input I switched from MMeshIntersector to MFnMesh, which is slower. I was having issues getting the matrix for MMeshIntersector to work. I used it in the past (see prAttractNode) so it might be a new bug, or I just made a mistake. On the upside it is more user friendly to not require the matrix input for mesh shapes.
Thoughts
The past ~5 years I haven't written any deformers with the Maya API. I mostly used it in Python scripts to improve performance and to use API exclusive features.
I find it strange that basic classes like MPxDeformerNode are still missing in the Maya Python API 2.0 after having tried it for the first time in early 2013.
A visual programming / procedural node option like Softimage ICE, Fabric Engine, Houdini would be a much better fit for most of my deformer needs. I was anticipating something similar for Maya in 2011, but after so many years and seeing what happend with Softimage and Fabric I have no idea if / when it will ever happen.
The verbose low level nature of C++ Maya deformers only seemed to have increased with the new MPxGPUDeformer class. I haven't really looked into it yet, but the devkit example MPxoffsetNode.cpp has ~600 lines of code for a simple one line vector offset algorithm. That seems quite far away from production problem solving and applied math that I would like to focus on when creating a deformer.
Thoughts
The past ~5 years I haven't written any deformers with the Maya API. I mostly used it in Python scripts to improve performance and to use API exclusive features.
I find it strange that basic classes like MPxDeformerNode are still missing in the Maya Python API 2.0 after having tried it for the first time in early 2013.
A visual programming / procedural node option like Softimage ICE, Fabric Engine, Houdini would be a much better fit for most of my deformer needs. I was anticipating something similar for Maya in 2011, but after so many years and seeing what happend with Softimage and Fabric I have no idea if / when it will ever happen.
The verbose low level nature of C++ Maya deformers only seemed to have increased with the new MPxGPUDeformer class. I haven't really looked into it yet, but the devkit example MPxoffsetNode.cpp has ~600 lines of code for a simple one line vector offset algorithm. That seems quite far away from production problem solving and applied math that I would like to focus on when creating a deformer.
2014-10-01
Harald rig breakdown
Harald rig breakdown from Parzival Roethlein on Vimeo.
In 2011 I worked on my last student short at Filmakademie called Harald: https://www.facebook.com/haraldfilm
I was responsible for the main character rigs (including blendshape and some meshflow modeling), animation scripts/support and animated one shot.
 |
| Final meshflow |
At first I updated my PyMEL autorigger from 2010 and rigged the bodies with it. Both spine and the bendy limbs are modified ribbon setups (see older post: Joint chain rigging techniques). There are no (corrective-) blendshapes for the body, only skinning.
The faces use a standard blendshape + joint combination to match the expression sheet and allow for customization. Reverse wrap deformer for eye bulge in eyelid. Eyelid joints sliding on geometry. Rig performance had some priority and the finished rig showing the final deformation (one subdivision level) ran at over 20 fps.
I created some animation scripts for the project Maya shelf including a UI (first time using Qt) requested by the animators, which was supposed to be similar to the one they used in a previous Filmakademie short: Der Besuch
And finally I animated one shot because I always wanted to do that, even thou I am not an animator. My previous experience was very limited, so I had to learn most animation principles for the first time and it certainly was a fun exercise to use my own rigs.
2014-09-22
BabyDragon walkcycle rig breakdown
Baby Dragon walkcycle rig breakdown from Parzival Roethlein on Vimeo.
This is a personal project from early 2013.
When I saw a turntable of the dragon on Vimeo (https://vimeo.com/52581835), I contacted the modeler. And after I was done with the rig a co-worker / fellow student did the animation.
For the neck / spine / tail I used the curve/up-curve setup, described in an older post of mine, with one joint for each spike:
Joint chain rigging techniques
Credits:
Modeller/Surfacing: Angel Navarro angelnavarroart.com/
Character TD: Parzival Roethlein
Animator: Alexander Dietrich cargocollective.com/alexanderdietrich
Unrelated to this post, I recently updated an older post:
Maya naming conventions
2013-07-07
Demoreel 2013
Password on request
Edit in 2015: No more password
Parzival Roethlein - Character TD Reel 2013 from Parzival Roethlein on Vimeo.
Edit in 2015: No more password
Parzival Roethlein - Character TD Reel 2013 from Parzival Roethlein on Vimeo.
2013-05-02
Maya wrap deformer tips
Attributes:
- After creating a wrap deformer the driver surface gets a dropoff and smoothness attribute. Usually the user can expect these attributes to be in the deformer ChannelBox/AttributeEditor. This has been changed for the wrap deformer for a case were there is one driver on multiple shapes, so the smoothness attribute gets connected to each wrap deformer. The smoothness only works with Falloff Mode: Volume and Exclusive Bind: off. As the name says it can help create smooth deformations. On the downside it moves unaffected neighbors of deformed vertices in the opposite direction, so that may be a reason not to use smoothness for some cases.
- When enabled Exclusive Bind improves performance a lot, but may lead to bad deformation. Works especially well when driver and driven have a similar resolution. I used this setting a lot in the past.
- I usually use Falloff Mode: Surface for smooth results, probably because my driver and driven object usually have a similar shape. The smoothness attribute requires Volume mode thou.
- maxDistance 0.0 disables maxDistance
Use cases:
- Deform highres geometry with easier to rig/cloth-simulate low-res geometry. For this case my tip is to output the lowres mesh into a separate mesh node and smooth/subdivide that and then use this highres version of the lowres mesh as wrap deformer driver on the actual highres mesh. The result is surprisingly fast when using exclusive bind etc and allows for much better deformation than using the wrap deformer the normal way and trying to adjust the wrap deformer attributes, which can never work properly (it's a non-barycentric binding) and gets really slow. As with many deformers in Maya, they are not very functional, but they are fast, so when making these procedural deformations you can compensate for the lack of features.
- When the driving mesh just has a skinCluster I prefer to copy the skinCluster and weights to the highres, because it calculates faster than a wrap deformer and you also have the option of tweaking the weights further.
- Use as partial blendshape, to be able to work on local area and with those patches drive the final one-piece mesh. Edit membership has to be used to avoid double transformation. Not a user friendly workflow. Exclusive Bind can be used to greatly improve speed (if meshflow is similar).
Example:

2013-04-23
Kool-Aid commercial: Rig breakdown
Kool-Aid commercial: Rig breakdown from Parzival Roethlein on Vimeo.
The complete spots:
https://vimeo.com/64086798
https://vimeo.com/64086797
The node order of the face, starting with the low resolution geometry:
-> blendShape
-> skinCluster (for the mouth I put the joints on a curve with motion paths, to tweak the curve cvs without getting intersecting loops, see old post: Joint chain rigging techniques)
-> bend deformer (To roughly match the body shape. Works for this range of motion, for more range I would recommend using a surface constraint / rivet on the nurbs surface and connect translation to UV values)
[lowres for animators]
-> smooth (subdivide)
-> sculpt deformer (project on nurbs surface with the same shape as the glass)
[highres, final shape]
And the highres geometry was used as a mask in compositing.
2013-04-03
Adventure Time - A Glitch is a Glitch
Yesterday aired the Adventure Time episode "A Glitch is a Glitch" (AT S5E15 AGIAG).
It was a special 3D episode (usually the show is 2D) and directed by David OReilly.
The rigging was done by Mark Feller and me at Studio Soi in July 2012. My main responsibility were the faces and spines. The faces were made by hand, some parts I could import and adjust after the first one was done. The mouth joints were sliding on a nurbs surface, that had the shape of the face polygons. For the spines I wrote a script (ribbon based. See older post: Joint chain rigging techniques).
This is a clip from the episode:
It was a special 3D episode (usually the show is 2D) and directed by David OReilly.
The rigging was done by Mark Feller and me at Studio Soi in July 2012. My main responsibility were the faces and spines. The faces were made by hand, some parts I could import and adjust after the first one was done. The mouth joints were sliding on a nurbs surface, that had the shape of the face polygons. For the spines I wrote a script (ribbon based. See older post: Joint chain rigging techniques).
This is a clip from the episode:
2013-03-01
Maya Naming Conventions
(updated on 2014-09-10)
L_arm_1_upper_... > L_arm_2_lower_... > L_arm_3_wrist_...
L_hand_1_thumb_1_metacarpal_... > ...
L_hand_2_index_1_metacarpal_... > L_hand_2_index_2_phalanxProximal_... > L_hand_2_index_3_phalanxIntermediate_... > L_hand_2_index_4_phalanxDistal_...
Usually it is also shortened to 2-3 letters, which I used to do as well (joint = jn/jnt, blendColors = bc, multiplyDivide = md). But after changing my "rules" over the years and using different ones at companies I suddenly wondered what the purpose of these abbrevations even is. Since they always introduce special rules, exceptions and may not even be readable from an outsider.
So my conclusion was to just use the full default Maya node names / types as suffix:
"..._blendColors", "..._multiplyDivide".
In the beginning, when more nodes were created manually, it might have been more convenient to only type a few letters as suffix. But by now most are generated with scripts anyway. And even when working manually and following this rule the default Maya behavior will generate the suffix by default (minus the 1 at the end).
But more importantly this rule creates unique, easy to learn, obvious suffixes for almost all nodes. There are a few exceptions, but even their solution are partly given from Maya. So they always make sense to Maya users.
Exceptions - from Maya:
Exceptions - from user:
Summary
- L_arm_1_upper_joint > L_arm_2_lower_joint
- Prefix = Region: Side ("L_..." / "R_..." / none for center) + region ("...arm_", "spine_", ...)
- Middle = Hierarchy numbering starting at 1 (not 0) followed by descriptive string ("...1_upper...", "...2_lower...")
- Suffix = Nodetype: Default Maya nodenames ("..._blendColors", "..._multiplyDivide", ...)
Motivation
This is a simple naming convention that currently seems the most logical to me, after having used different ones of myself and coworkers in the past. The main goals are:- Readability (from the name know what it is and where it is used. But not too long)
- Simplicity (easy to learn, avoid confusion, hard to make mistakes, few exceptions)
- Functionality (easy to work with: string search / filter)
Prefix = Region ("L_arm_...", "spine_...")
If a region is in the center and/or only appears once start with it "spine_...", "head_...". Else insert side shortcut before region "L_...", "R_..." ("L_arm_...", "R_leg_..."). Reasons:- For regions that appear multiple times (L_arm, R_arm, ...) all related nodes will have unique names, just by adding the side prefix
- Abbrevation to save reading time and space. If a name is too long for a Maya UI element (ChannelBox, graph editor, ...) the name usually (always?) gets cut of at the right side. So having a short prefix delays that. Opposed to using the more descriptive, but longer versions "Left_"/"Right_" or "Lf_"/"Rt_".
- This is a "special rule" (anti readability and simplicity), but it is such a simple one and used so frequently that is hard to use wrong or forget.
Middle = Hierarchy ("...1_upper...", "...2_lower...")
- Start with number, counting in the cranial (spine) / distal (limbs, fingers) / lateral (clavicle) direction, to allow for alphabetic ordering, which can be useful in the paint skin weights tool for example. For most people it is more intuitive to start counting at 1. Opposed to loop variables usually starting at 0 (Python: for x in range(..)).
- Followed by a string description to understand where the element actually is (readability). This string could be standardized, but this post is about a simple naming convention.
- Going from general to detail is easy to read and helps with isolating regions for string search / filter ("L_hand_2_index*").
- All this also helps to have unique transform node names. Which can have the same name, if they are not in the same hierarchy level. Opposed to "pure" DG (dependency graph) nodes (multiplyDivide, skinCluster,...).
L_arm_1_upper_... > L_arm_2_lower_... > L_arm_3_wrist_...
L_hand_1_thumb_1_metacarpal_... > ...
L_hand_2_index_1_metacarpal_... > L_hand_2_index_2_phalanxProximal_... > L_hand_2_index_3_phalanxIntermediate_... > L_hand_2_index_4_phalanxDistal_...
Suffix = Nodetype ("..._multiplyDivide", "..._locator")
The nodetype is usually the suffix. Theoretical that should not be necessary, since command searching allows for a type filter (pm.ls('L_arm*', type='joint')). But when manually working in a scene it helps to read graphs / history and it also helps at having unique names.Usually it is also shortened to 2-3 letters, which I used to do as well (joint = jn/jnt, blendColors = bc, multiplyDivide = md). But after changing my "rules" over the years and using different ones at companies I suddenly wondered what the purpose of these abbrevations even is. Since they always introduce special rules, exceptions and may not even be readable from an outsider.
So my conclusion was to just use the full default Maya node names / types as suffix:
"..._blendColors", "..._multiplyDivide".
In the beginning, when more nodes were created manually, it might have been more convenient to only type a few letters as suffix. But by now most are generated with scripts anyway. And even when working manually and following this rule the default Maya behavior will generate the suffix by default (minus the 1 at the end).
But more importantly this rule creates unique, easy to learn, obvious suffixes for almost all nodes. There are a few exceptions, but even their solution are partly given from Maya. So they always make sense to Maya users.
Exceptions - from Maya:
- Default transforms will get different names in Maya, depending on how they got created: null1 (empty group), group1 (group for transforms), transform1 (actual node name). Most people call default transforms (no shape / special function) groups, so I stick with group as well. To prevent hard to read suffixes when using stacked groups ("..._group_group_group") I like to use descriptive names ("..._null_group", "..._sdk_group", "..._space_group").
- Transforms with shapes get names from the shape nodeTypes (locator1, annotation1, ...). So Maya already gave an answer how to name those transforms. Shapes themselves will get the Shape suffix.
- Transform Handles (deformer handles) get named: "nodetypeXHandle" in Maya. So I also use this convention, except for the number in between, so it's only "deformertypeHandle". Example: L_cheek_clusterHandle (cluster itself: L_cheek_cluster)
- ... (probably more)
Exceptions - from user:
- Animation transforms: Usually transforms are the only nodes animators are exposed to. That's why they often get named differently. For this convention I prefer "_control" over "_nurbsCurve".
- ... (probably more)
Code
Notes:
- Maybe lowered prefix letter (Pro: Consistency, closer to PEP8 Python recommended variable names [lower_case_with_underscores]. Con: Lower L looks like capital i)
- Maybe have a prefix for all areas for consistency ("C_" = center, ...)
2013-01-30
Fish rig - Beck's Sapphire
The last project I worked on at Psyop. I was responsible for the rigging.
Update: HD version
Update: HD version
Beck's Sapphire "Serenade" from Psyop on Vimeo.
2012-11-29
Rig performance tips
A rig should always be as fast as possible to improve productivity of animators. It is also more fun to interact with a fast rig in general and maybe even allows for viewing the animation in realtime inside of the viewport. So there is no need to create a playblast all the time.
The biggest factor is the geometry resolution (lowres/highres/..) and the kind of setup the rigger chooses Hopefully always balancing quality and speed. This is very project and people dependent. So I'm not going into that here. This post should just be a small list of things that always work and are not that well known (?):
- Remove vertices from the deformer, if they are not affected, with the "Edit Deformers > Edit Membership Tool". I almost always use this for lattice, wrap, wire, sculpt, .. There are probably cases for all deformers. This can also be achieved by only selecting the affected vertices when creating the deformer.
- Use few skinClusters by merging geometries. This should be used carefully of course, because it can be annoying to skin overlapping geometry (maybe skin multiple geometries and copy skin weights on the final merged mesh when publishing the rig) and other steps in the pipeline have to be considered as well.
- Remove unused influences from skinCluster. Use "Skin > Edit Smooth Skin > Prune Small Weights" before. Each influence costs a little bit of performance, so if you have multiple geometries that are skinned to all skinning-joints this can make quite a difference.
- Connections instead of constraints. A lot of point/orient/parent/scale-constraints can be replaced by simple translate/rotate/scale connections, if the hierarchy is setup in the right way (Maybe by creating an extra null-group to have the same local transformation values). BlendColor nodes can be used for blending. I think scaleConstraints are always the worse option, and can be avoided completely.
- Don't use clusters to deform curves. Instead use a skinCluster (use component editor to tweak skinning weights) or [Credit to Francisco Naranjo:] connect locatorShape1.worldPosition[0] into the curveShape1.contolPoints[x] attribute
- Delete unused Orig shapes. This does not effect the rig speed when interacting, but is about filesize, which increases file-opening / reference-loading time. Whenever you create a deformer, maya also creates an Orig shape (intermediate object). If you duplicate a geometry that had an orig shape, it will get copied as well, but ignored for future deformers. So it basically just increases the filesize with no benefits. You have to remember to delete it, or delete the history before you duplicate. (An easy shortcut-combination to select the orig shape: Arrow down (child), arrow left (latest child)
2012-11-12
Joint chain rigging techniques
Comparing different joint-chain-like rigging techniques. The idea is always to attach the skinning joints to a simple nurbs-curve or surface, which can easily be rigged. They all have squash/stretch/twist behavior. This kind of setup is useful for spine, bendy limbs, face (lips, eyebrows, muscle), snake, hair, tail...
They can be categorized as parametric and non-parametric. Meaning that joints will keep relative distance between each other (non-parametric) when changing the driving surface or not (parametric).
I recently compared them. Mainly for performance reasons, but keeping functionality in mind. The screenshots are from simplified setup versions.
Spline-IK
Ribbon
Joints attached to nurbs surface
Curve / Upcurve
Two curves. One has the skinning joints attached to it. The skinning joints either aim at the next skinning joint (spline-IK like behavior) or are rotated at the average of aiming to next/previous (ribbon like behavior). On the second curve are the up-objects for the aimconstraints. Both curves are deformed in the same way, so that rotation along the joint-curve (twist) will only deform the Upcurve, so there will be a smooth twist driven by the up-objects.
Muscle Spline
Muscle > Bonus Rigging > Create Muscle Spline...
Related
Conclusion
Curve / Upcurve setups are the most flexible and offer the most control, which probably results in the best deformation for most cases. But can be slower depending on the setup.
To get a better idea what "fastest" / "slowest" for these setups mean. Here are the fps numbers when adding eight chains (two for each limb, six joints each) of either type to a base rig that runs at 34 fps
34.0 base rig
28.6 (-5.4) pointoncurve
27.7 (-6.3) splineik
27.2 (-6.8) ribbon
26.7 (-7.3) motionpath
26.3 (-7.7) pointoncurve avrg
They can be categorized as parametric and non-parametric. Meaning that joints will keep relative distance between each other (non-parametric) when changing the driving surface or not (parametric).
I recently compared them. Mainly for performance reasons, but keeping functionality in mind. The screenshots are from simplified setup versions.
Spline-IK
 |
| Spline-IK |
- Non-parametric
- + Fastest non-parametric setup
- - Limited twist control: Only start and end. No center twist control
- - Undesirable behavior when modifying curve-cvs (overshooting joints)
- - Gets exponentially slower when increasing joint count
- + Easy to add dynamics/simulation on curve (because it is only one)
Ribbon
Joints attached to nurbs surface
 |
| Ribbon |
- Parametric
- + Full local control
- Average speed
Curve / Upcurve
Two curves. One has the skinning joints attached to it. The skinning joints either aim at the next skinning joint (spline-IK like behavior) or are rotated at the average of aiming to next/previous (ribbon like behavior). On the second curve are the up-objects for the aimconstraints. Both curves are deformed in the same way, so that rotation along the joint-curve (twist) will only deform the Upcurve, so there will be a smooth twist driven by the up-objects.
 |
| PointOnCurveInfo |
 |
| MotionPath |
- + Can be non-parametric (motionpath) or parametric (pointOnCurveInfo)
- + Fastest setup when using pointOnCurveInfo (only when using one aimconstrain upwards)
- - Slowest setup when using motion path
- + Full local control between start and end, depending on setup
- Note: motion path rotation should be used carefully (almost never?). Following curve results in more extreme rotation (bigger difference between neighbors) than average of aiming up+down. So deformation will look bad in most cases.
- Note: Motion path should be created manually (createNode motionPath). Because the MEL command (motionPath) creates unnecessary doubleLinear nodes that create cycle warnings and the command is not undoable.
Muscle Spline
Muscle > Bonus Rigging > Create Muscle Spline...
 |
| Muscle Spine |
- Parametric
- (+) Has a lot of functionality by default
- - Joints get oriented to curve (same problem as motion path rotation... The average of aiming on upper and lower joint is probably always better)
- + Nice tangent/curve control attributes from start/mid/end ctrls
- + Seems to be a bit faster than Spline-IK (but it is not non-parametric like the Spline-IK. So they are not fully comparable)
- + Jiggle options (for hair, props, tail, antenna, .. ?)
- Local twist, but limited control over it (flip at 180), because it is calculated in blackbox node.
- Note: For easy to animate curves set small "Tangent Length" value (0.01) on start/end ctrl and increase on the center ctrl to have automated bend when moving center ctrl. Also edit "uValue" attribute on first (from 0.0 to 0.01) and last joint (1.0 to 0.99), so they get oriented to the curve.
Related
- Wiredeformer is parametric
- Curve added as influence to skinCluster (component mode on) is non-parametric
Conclusion
Curve / Upcurve setups are the most flexible and offer the most control, which probably results in the best deformation for most cases. But can be slower depending on the setup.
To get a better idea what "fastest" / "slowest" for these setups mean. Here are the fps numbers when adding eight chains (two for each limb, six joints each) of either type to a base rig that runs at 34 fps
34.0 base rig
28.6 (-5.4) pointoncurve
27.7 (-6.3) splineik
27.2 (-6.8) ribbon
26.7 (-7.3) motionpath
26.3 (-7.7) pointoncurve avrg
2012-10-16
Rigging papers
Because of the boring commute / subway riding I have been reading papers/sketches. Here are some of my favorites. I really hope to find some time in the near future to write a few more Maya plug-ins / nodes or improve my old ones.
Spiderman 3 Muscle and Skin Musculoskeletal Skinning
https://erickmiller.com/docs/sap_434_MusculoSkeletalShapeSkinning.pdf
https://www.youtube.com/watch?v=fNCB9wZP8k8&feature=relmfu
https://erickmiller.com/docs/iRobot_Character_Pipeline_sketches_0250.pdf
https://www.youtube.com/watch?v=mX9rMQv4TC0
https://www.youtube.com/user/erickmiller
And this is a more educational paper:
The Morphology of Digital Creatures
https://www.tim-mclaughlin.com/wp-content/uploads/2012/06/Morphology_of_Digital_Creatures-SIGGRAPH_2007_course.pdf
Spiderman 3 Muscle and Skin Musculoskeletal Skinning
https://erickmiller.com/docs/sap_434_MusculoSkeletalShapeSkinning.pdf
https://www.youtube.com/watch?v=fNCB9wZP8k8&feature=relmfu
- Muscle shape: NURBS surface from curves, keep volume
- Muscle to skin deformer: paintable linear or dual quaternion interpolation, paintable sliding (bulge/shrink along attachment vector)
- Pose space deformer
- Jiggle deformer: For muscle shapes, spring based solver/equasion
- Skin tension: spring based, projected back on mesh (closest point), user defined smooth/average steps
https://erickmiller.com/docs/iRobot_Character_Pipeline_sketches_0250.pdf
https://www.youtube.com/watch?v=mX9rMQv4TC0
- Animation curve re-mapping with NURBS surface
- Gaussian filtering on animation against motion pops
- Pose based deformation
- Custom wrap deformer
- Animation friendly jiggle node
- Custom cluster deformer
- Deform eye geometry to fake eye refraction
https://www.youtube.com/user/erickmiller
And this is a more educational paper:
The Morphology of Digital Creatures
https://www.tim-mclaughlin.com/wp-content/uploads/2012/06/Morphology_of_Digital_Creatures-SIGGRAPH_2007_course.pdf
2012-03-15
How to improve as a rigger
So because my studies are finishing, I reflected a little bit on the past and here are my conclusions on how to improve / learn the most from a student perspective and optimize your demoreel. I personally did not think about some points and/or did not have a choice, so my past does not fit this description very well.
But of course you should always do what you enjoy most. And most of the following points happen automatically over time anyways.
But of course you should always do what you enjoy most. And most of the following points happen automatically over time anyways.
- Specialize in rigging. The more time you spend on other disciplines, the less time you will have spent on rigging. Note: Of course it is good to have a basic understanding of all connected areas, to improve working with the different co-workers (modelers, animators, r&d, pipeline) and to be more independent, require less feedback and be able to give better feedback. But after the basics there will be a moment, when it is better to do more rigging instead.
- Work closely with animators as soon as possible. Because they are the people that use your rigs?! If you are an animator yourself, this is not as important. But there are also different preferences between animators.
- Work with experienced/specialized co-workers. Because animators will know what they want and if they have a lot of experience with different rigs, they will request the nicest features they know and improve your rigs that way. Good modelers will ease/improve deformation. And generally the better the co-workers the better the end-result, which will make your work look better. And you can learn more from each other.
- Work on few projects (quality>quantity) with people that work on few projects. If everyone has more time the quality of everyone's work should be better. Also the shorter the length of the film the better the quality (animation, rendering,..).
- Create few character rigs (quality>quantity). Try to find projects with few characters (or do not rig all of them if there are too many). To improve quality and because you can only show a few rig demos in your demoreel. Note: It is also important to learn how to improve pipeline/workflow/speed. If you have to rig a lot of characters you are forced to do that, but you can still do it with a few characters if you want to.
- Rig extreme (cartoony/realistic) characters. That way you learn how to create extreme motion (2D style) and recreate anatomy (deformation focus) in CG. If your character is stylized in-between you don't learn as much about anatomy, because it is not required (same for extreme motion). It basically is about having a good/clear target to aim for. Note: Some people probably want to focus on either cartoony or realism, so the other area can be dropped. That way the quality should improve in your area, but it will reduce the amount of companies you can apply to.
- Rig different kinds of characters/creatures: Biped, quadruped, bird, snake, mechanical, ... Because they have different requirements and anatomy.
- Scripting: Learn to script, to automate repetitive tasks. Optional: It can also be good to learn programming to: 1. Write better scripts, that other people can work with 2. to create new tools for other people to improve workflow 3. Write plug-ins for new functionality 4. Design a pipeline... These things are usually done by more experienced professionals. For a student it probably is better to keep it limited (see point 1.).
2012-01-27
Demoreel 2010
This is my old Demoreel. It was made in 2011/02 with content from 2010 and a breakdown in the Vimeo video description. This post is about the process of creating the reel and the results in retrospect. Because it is almost one year old, I may have forgotten a few things.
Parzival Roethlein - Character TD Reel 2010
Making-of:
Parzival Roethlein - Character TD Reel 2010
Making-of:
- Decided on resolution and frame rate. (720p and 25fps)
- Made Maya playblasts (project was not rendered yet) to show animated rig. (720p, 25fps)
- Screen captures with CamStudio (free), to demonstrate rig functionality. (720p, fps not important, since I speed up the screen captures anyways)
- The video files from CamStudio and Maya playblasts were then converted to a image-sequence (jpg or png), using VirtualDub (also free). This way it is fast to work with the data when editing and rendering the final video.
- Title and description texts made in Photoshop.
- Image sequences and texts imported to Adobe After Effects for editing and final video export. The style of rig presentation with frame-freezing, then blurring and animating the text was popularized by Victor Vinyals (I think) with his demoreel in 2007.
- Spent one day for first version, gathered feedback, then one more day for final version.
- Because I am a student I only applied for jobs in the two semester breaks of 2011.
- For the first semester break in March I applied at around six German companies as a freelancer. I would say one third did not answer, the others gave nice responses, but only the one that actually had a relevant job listed on their website hired me. (Animationsfabrik)
- For the second semester break I wanted to get a rigging-internship at a big studio in a foreign country. So I applied at two companies in London and two in the US. One of the US studios told me I was in the final selection, but I did not hear from them afterward. The other US studio send me a rejection (cg software internship). From the two London companies one did respond and I got the internship there (Framestore). I also entered this reel to the "Computer Graphics Student Awards" on cgCoach.com and won an internship there, but since I already had an internship by then, it did not really matter.
2012-01-26
Maya API resources
Because I uploaded a few open source Maya Plug-ins on CreativeCrash I got some e-mails regarding basic Maya API learning material. So I wanted to write a small summary in this post, mainly to plug the free video webcast with exercises from the Autodesk Developer Center:
Maya (intermediate) (select from in the "Course" menu. There area also other Maya API courses, but I could not do any of them yet) [Updated link: https://www.autodesk.com/developmaya]
But mostly I use:
- Autodesk Maya API Guide and Reference
- Comet Cartoons (Michael Comet) Very practical information when writing code. Especially when using different attribute types for the first time.
And during my internship at Framestore I had a chance to see the two DVDs, which sadly don't seem to be for sale anymore:
- Writing Creature Deformers (Erick Miller). Introduction to deformers. Also a good starting point when writing your own skinCluster, cluster or partial blendshape node. This DVD was not that useful for me, because I had written a deformers already, so there were only a few small things interesting for me. But if you are starting then this DVD will certainly safe you a few days of learning.
- Introduction to the Maya API (Barbara Balents)
The pdf Skinning in Maya at Industrial Light & Magic (Andrea Maiolo) gives detailed information on how to managa skinCluster data including paintable attributes.
ChadVernon.com is a nice blog as well and there is also a list of resources.
Maya (intermediate) (select from in the "Course" menu. There area also other Maya API courses, but I could not do any of them yet) [Updated link: https://www.autodesk.com/developmaya]
But mostly I use:
- Autodesk Maya API Guide and Reference
- Comet Cartoons (Michael Comet) Very practical information when writing code. Especially when using different attribute types for the first time.
And during my internship at Framestore I had a chance to see the two DVDs, which sadly don't seem to be for sale anymore:
- Writing Creature Deformers (Erick Miller). Introduction to deformers. Also a good starting point when writing your own skinCluster, cluster or partial blendshape node. This DVD was not that useful for me, because I had written a deformers already, so there were only a few small things interesting for me. But if you are starting then this DVD will certainly safe you a few days of learning.
- Introduction to the Maya API (Barbara Balents)
The pdf Skinning in Maya at Industrial Light & Magic (Andrea Maiolo) gives detailed information on how to managa skinCluster data including paintable attributes.
ChadVernon.com is a nice blog as well and there is also a list of resources.
Subscribe to:
Posts (Atom)